Friday 30 June 2017

CAS-ual Fridays: CFC 177

Welcome to a new challenge at CAS-ual Fridays!
 We're playing TicTacToe today, and I went with the middle column - one layer, tag, rainbow!

 I white embossed the Thank you stamp in So Pretty for the sentiment, and the tiny star from Sassy Smiles is stamped and embossed with glitter embossing powder. I blended a rainbow of Distress Inks for a soft background, and added a white ribbon as a finishing touch.

   Make sure you check out what the rest of the design team have made for this challenge!

Thanks for visiting :) 

Thursday 29 June 2017

Rainbow birthday card

When I need a quick and easy birthday card, I can't go past a stencil and a big, bold sentiment.
I used the Crossing Waves stencil from Hero Arts with Distress Inks in Abandoned Coral, Dried Marigold, Squeezed Lemonade, Twisted Citron and Salty Ocean. I then added a sentiment from Avery Elle's Big Greetings set, stamped in Versafine Onyx Black. I finished with a few sequins from Pretty Pink Posh. Quick, simple, but effective!
I'll be sharing this card at the Simon Says Stamp Wednesday Challenge - their theme this week is "Anything Goes".
Thanks for visiting :)

Tuesday 27 June 2017

Inspired by a colour scheme

I've combined two challenges with the card I'm sharing today:
I used the Hello Lovely set from Concord & 9th, along with a sentiment from Wplus9's Kind Soul. I white embossed the floral image, and then coloured the flowers with Zig markers and water. I tried to leave a fair amount of white space in between the floral sections, and kept it as a one-layer card with only 3 sequins as embellishments to keep it pretty clean and simple.
 I'll be sharing this at Inspired by all the little things - I used the colours of the umbrellas (albeit a bit less vibrant!), and I used the sketch from the Less is More challenge:

Thanks for visiting :)

Sunday 25 June 2017

Less is more sketch

I'm playing along with a sketch challenge today, and also using up leftovers from a card I made last week:
The background is from MFT, white embossed and then coloured with Faber Castell Gelatos, then lots of shimmer with Perfect Pearls and Wink of Stella. The white panels are cut with a die from Lawn Fawn, and the sentiment is from Avery Elle. I added some more Wink of Stella to the "happy" die cut, and also added some Pretty Pink Posh sequins.
 I've used the sketch from the Less is More challenge:
http://simplylessismoore.blogspot.com.au/2017/06/challenge-334-sketch-20.html
 Thanks for visiting :)

Friday 23 June 2017

Blue birthday wishes

I was out for lunch with my crafty friend Cecilia yesterday and as we were paying for our meals, I noticed a blue and white patterned plate next to the cash register. I immediately decided that I had to make a blue and white card when I got home. So I did!
I used the Floral Fantasy background stamp from My Favorite Things, white embossed onto Canson watercolour paper. I then coloured randomly with Zig clean color real brush markers and sprayed with water. (I actually had a false start with this card - I accidentally sprayed with stamp cleaner instead of water! That piece ended up in the bin!)
I added a sentiment using alphabet stamps from Concord & 9th, and a die from Mama Elephant. I also cut the panel with add a strip of blue down the left to give the sentiment something to attach to.
I'll be sharing this card at The Challenge at Lesley Croghan's blog "Always Playing with Paper". I'll also be joining in at "Inspired by all the Little Things"
http://alwaysplayingwithpaper.blogspot.com.au/2017/06/the-challenge-88-keywords.html
Thanks for visiting :)

Thursday 22 June 2017

Fusion: 4th of July jars

Welcome to a new challenge at Fusion!

I went with the sketch this time, and I made it into a landscape card rather than portrait.  I used Altenew's Amazing you stamp set, along with a sentiment from Reverse Confetti "Lots to Say".

http://fusioncardchallenge.blogspot.com.au/
 Thanks for visiting :)

Tuesday 20 June 2017

Layering ink smooshing with Copics and embbossing

I wanted to make something today, but I had no ideas, so I went to my never-fail source of inspiration - Kelly Latevola! She recently made THIS CARD and I wanted to try the same technique with layers of stamping, ink smooshing, copic colouring and embossing.
I teamed the bouquet image from Concord & 9th with a sentiment from Wplus9.
 I'll be sharing this card at Where Creativity Meets C9 - their theme this month is "Layered".
http://www.wherecreativitymeetsc9.com/ch10/
I'll also be sharing this card over at the Simon Says Stamp Wednesday challenge blog, where the challenge this week is "emboss it" 

http://www.simonsaysstampblog.com/wednesdaychallenge/simon-says-emboss/
Thanks for visiting :)

Monday 19 June 2017

Celebrating with Chibitronics and A Blog Named Hero

Hello! I have an interactive card for you today for the challenge at A Blog Named Hero! I know, it's not even time for Christmas in July yet, but it's never to early to start making Christmas cards!!
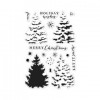
I used the Snowy Tree cling stamp from 
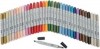
Hero Arts - unfortunately discontinued, but the Color Layering Christmas tree stamp is very similar. I stamped it after colouring direct to the rubber with some Zig markers, then spread the colour on the watercolour paper with a water brush. I then stamped the same image over the top to add back in the detail that was lost with the water.
I die cut the star from the top of the tree, and added a Copic coloured piece of vellum behind the negative space. I also gold embossed the sentiment on vellum and wrapped it around the watercolour panel.  
With my first card using the Chibitronics lights (see HERE), I attached the decorated panel to the card base using foam adhesive tape.  This worked great, but I found that when I lit up the card, you could see where the foam tape was behind the panel. I tried a different approach with this card - I attached the watercolour cardstock to a piece of red layering paper from Hero Arts, and I die cut a larger star behind where the smaller star is on top of the tree. I then used two layers of fun foam to raise this panel up on the card base - I just cut another star in the fun foam, and a square in the bottom right corner to make room for the battery housing.
I plan to write a note inside this card to make sure the recipient knows where to press to get the light to shine :)

Here's a little video:

Have you entered our challenge yet?
http://www.ablognamedhero.com/2017/06/challenge-interactive-with-chibitronics-part-two/

Thanks for visiting :)